

A powerful new feature in Windows Vista is the ability to use System Restore while in the Vista Recovery Environment. This allows you to restore your computer to a previous working state even in the event that you can't normally start Windows Vista. Before you can use System Restore to repair Vista, though, System Restore will need to have been enabled and running previously. The reason is because if System Restore was not running, then restore points would not have been created that you can restore. For more information on System Restore, how to make sure it is enabled on your computer, and to see what restore points are available you can read this tutorial: Windows Vista System Restore Guide.
The first step to using System Restore when you can't start your computer is to start the Windows Recovery Environment from the Windows Vista DVD. To start the Windows Recovery Environment you need to insert the Vista DVD into your DVD drive and turn your computer on. Your computer will start and you should see your BIOS listing your hardware and other information. When that information has been cleared, your computer will see that a bootable DVD is inserted and present a prompt similar to Figure 1 below.

Figure 1. Boot the computer from the CD or DVD
As you want to boot the computer from the Windows Vista DVD you need to press a key, any key will do, on your keyboard when you see this prompt. It is possible that the DVD that came with your computer does not allow you to boot off of it. If that is the case, then your computer manufacturer most likely installed the Windows Recovery Environment directly to a small partition on your hard drive. To access this partition, you would slowly tap the F8 key on your keyboard after the BIOS information clears from your screen until you see the Windows startup menu. From this menu use your arrow keys to select the option for the Windows Recovery Environment and press the enter key on your keyboard. You should now see a black screen with a white status bar at the bottom stating Windows is loading files.... After a while, the status bar will turn completely white and you will see a screen stating that Windows is loading. The Windows Setup environment will continue to load and when finished you will be presented with a screen similar to Figure 2 that prompts you for information about your location and language
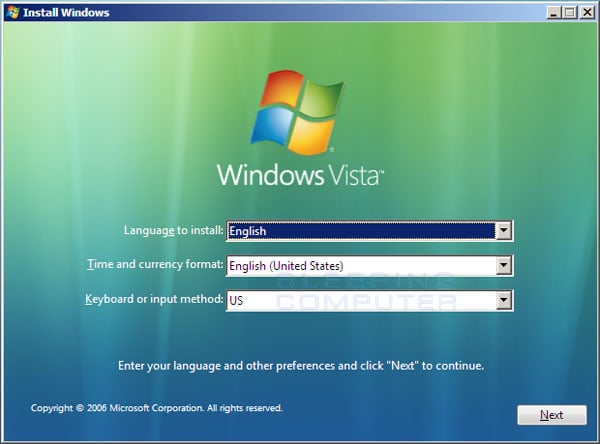 .
.Figure 2. Configure language and location options in Vista Setup
At this screen you should configure the Language to install, Time and currency format, and Keyboard or input methodoptions so that they are set correctly. When done, press the Next button. You will now be at the main Windows Vista setup screen where you would normally install Vista on to a computer.
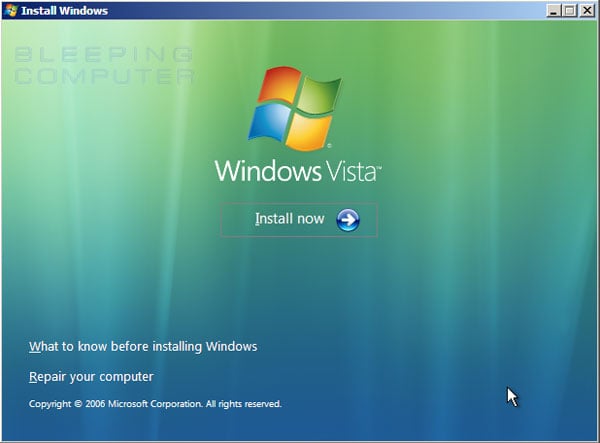
Figure 3. Windows Vista Setup options
As we want to repair the computer, you should click on the Repair your computer option. This will bring you to a new screen where the repair process will look for all Windows Vista installations on your computer. When done you will be presented with the System Recovery Options dialog box as shown in Figure 4 below.
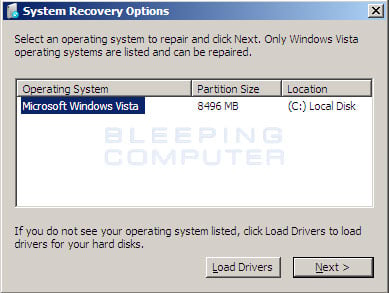
Figure 4. System Recovery Options
Select the Vista installation you would like to repair and if there are drivers you need to load in order for Vista to access any of your drives or other components , then you should click on the Load Drivers button to load them. When ready, press the Next button to continue. If the repair process does not detect any problems starting Vista, it will display a list of available recovery tools. If it does detect a problem it will attempt to perform a Startup Repair to automatically fix these problems. If you would like to allow this process to continue, then you can read more about it here. Otherwise click on the Cancel button and select the View advanced options for system recovery and support option to see the list of recovery tools.
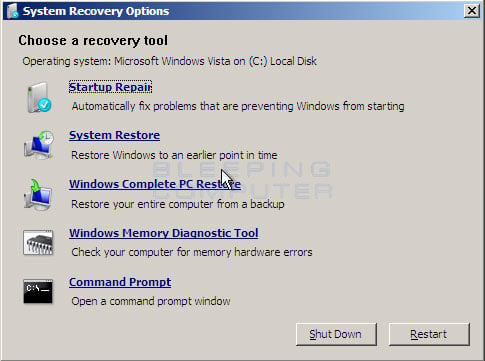
Figure 5. System Recovery Options
As we want to perform a System Restore, you would click on the System Restore option. Once you click on the System Restore option, the System Restore wizard will start and you will see a screen similar to Figure 6 below.
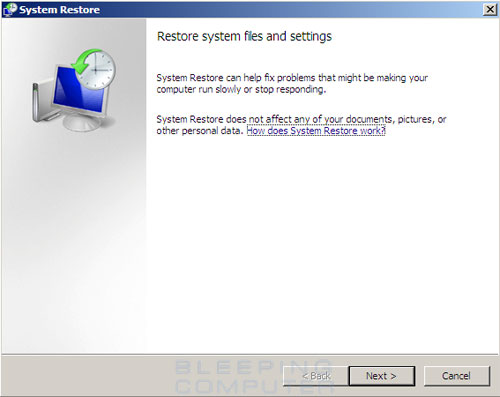
Figure 6. System Restore wizard
At this screen you should press the Next button, which will bring up a new screen listing all of the restore points that are available to restore.
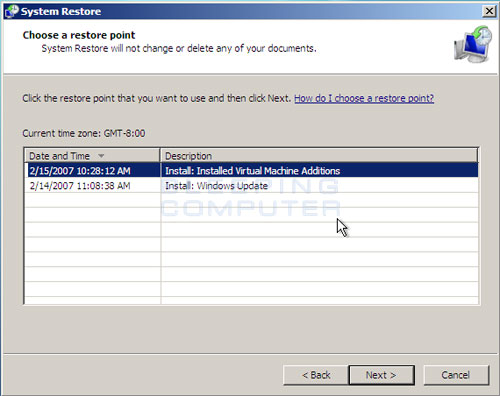
Figure 7. Available restore points
The restore point that you choose should be one in which you know that the operating system was working correctly. To select and use a particular restore point you would left-click once on an entry so it is highlighted and then press the Next button. You will now be presented with a screen asking you to select the disks that should be restored.
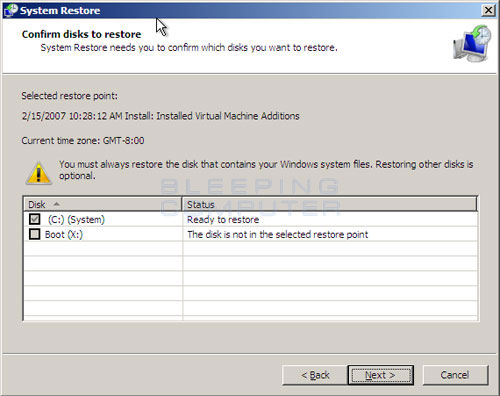
Figure 8. Confirm the drives to restore
By default, the disk that Vista is installed on will automatically be selected and cannot be unselected. If there any other disks that System Restore was monitoring and that you would like to restore, you would put a checkmark next to them. When you have selected all of the disks to restore, you would then click on the Next button to get to the confirmation screen.
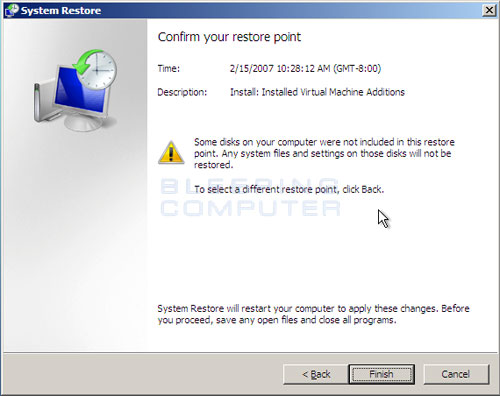
Figure 9. Confirm your System Restore
If you are satisfied with the restore point that you are going to use, then you should press the Finish button. Once you press the Finish button you will be shown an alert warning you that once you start the restore, it cannot be stopped. If you are prepared to continue, press the Yes button. System Restore will now restore the selected restore point to your computer. When it has completed you will be presented with an alert stating that it has finished successfully.
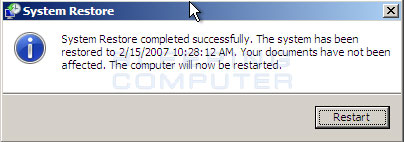
Figure 10. System Restore needs to restart your computer
Now that System Restore has finished restoring the restore point, you need to restart the computer by clicking on the Restart button. Your computer will restart and when you log back into your desktop, you will be presented with a final System Restore alert as shown below.
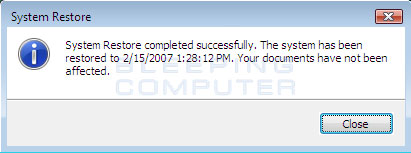
Figure 11. Your computer has been restore
Windows Vista is now restored to the selected restore point and your computer should hopefully be operating correctly. If there are still problems with your computer then you can attempt to use the other available repair tools. Tutorials on how to use these tools can be found below:
- How to automatically repair Windows Vista using Startup Repair
- How to use the Command Prompt in the Vista Windows Recovery Environment
- How to use the Vista Windows Memory Diagnostics Tool
- Using Windows Complete PC Restore to restore your computer
No comments:
Post a Comment